
Fuel Your Guitar Love. Explore New Styles.

JP BLOG
Share this
It’s never easy falling out of love. It can be hard to face the reality that the excitement just isn’t there anymore. The same holds for your relationship with your guitar. If you find yourself getting bored and spending less and less time with your six-stringed beauty it may be because there isn’t anything to keep the relationship exciting and fresh.
To keep the intimacy going with your guitar you’ve got to spice things up! If you find that your usual routine with your instrument is pushing you away from it, it’s time for new ideas, experiences, and approaches.
Here are 4 styles you can start learning that will help you fall back in love with your guitar.
 Rock Guitar
Rock guitar is considered by many guitarists to be one of the easiest styles to learn. This style of playing doesn’t require the same level of theory comprehension you’d find in jazz or classical. Yet, from the 1950s onward Rock n Roll took over the music scene with its overwhelming popularity.
Don’t let the simplicity fool you… Rock music utilizes power chords and riffs.
These are relatively simple concepts that have endless applications. This is a great style to learn because you can start at any level and develop a keen understanding without the challenges that come with other styles. It’s also a ton of fun to play along to songs by rock staples like Led Zeppelin and ACDC!
Here’s an introduction to chordal riffs and how they are used in rock music. Explore JamPlay’s guitarist toolkits.
Country Guitar
Country music is a genre of music that finds its roots in different styles like bluegrass, blues, rock, and jazz. Learning the concepts behind country guitar can bring gratification to your guitar playing because of its rhythmic focus and theory.
Often considered overhyped, don’t be fooled by the theoretical understanding of music and technical ability this genre can have on your guitar playing.
And let’s not forget that country guitar has some of the best licks you can learn!
Learn how how major and minor pentatonic scale can be used in genres like country with this video lesson from JamPlay.
Fingerstyle Guitar
Fingerstyle guitar is one of the most unique approaches to guitar out there. If you are used to having a pick in your hand and want to try something completely new fingerstyle is a great way to revolutionize your playing.
With this style, you use your fingers to play rhythm and melody simultaneously. This is something that can be incredibly challenging to do with a pick because of its limitations.
This approach turns the guitar into a completely different instrument and can get your creative juices flowing.
Check out this basic right-hand fingerstyle technique to get you started.
Blues Guitar
This is a style that played a significant role in western guitar. Learning blues guitar can help you develop your understanding of music theory and improve your improvisational skills. If you so dare this you’ll find unique chord progressions and rhythms that you’ll be able to use as a canvas to showcase your knowledge of the fretboard.
Yes, this style can be a little daunting but if you’re willing to give it a shot getting the fundamentals down can be a rewarding experience for you and your guitar.
Ready to take on the blues? Check out this JamPlay lesson on adding chord tones.
JamPlay is home to more than 500,000 guitarists with guitar lessons from world class instructor artists in every genre and for every interest to power up your guitar skill. Join at JamPlay.com.

Related Posts
Comments

5 Techniques to Make Your Guitar Playing More Expressive
JP BLOG
Share this
If learning guitar is one of your main goals or you’re getting back into it it’s important to get the fundamental techniques of playing down. From fingering chords to strumming rhythms to picking individual notes, making music with the guitar is becoming a reality. As you continue to develop as a player, here are some techniques you can use to make your playing more expressive.
Palm-muting
Palm-muting can give your playing a percussive quality that works well in a variety of music genres, from the distortion-driven chugging of heavy metal to the percussive rhythms of acoustic rock. This technique involves lightly resting the bottom of your palm on your strumming hand down on the strings close to the neck. The goal is to lightly deaden the sound when you strum but not completely.
Palm-muting reduces the sustain of the strings, creating a muffled staccato sound when you strum. This sounds especially well when you’re playing power chords, but it can be used to spice up your lead playing as well. The closer to the bridge your palm rests, the more sustain you’ll allow from each strum. As you move further away from the bridge, the sound becomes deadened. Even though palm-muting adds more expressiveness to your playing, it’s a relatively easy technique to begin experimenting with. It’s also a technique that fits well with acoustic or electric guitar styles.
Take a look at this video lesson from JamPlay on Palm-muting. Explore the many ways that JamPlay can help you improve your technique to become a more expressive guitar player.
Pick-raking
Closely related to palm-muting, pick-raking also adds some percussive spice to your playing. Pick-raking, however, has less to do with muffling the sounds of notes played and is more about deadening the pitch of a string entirely. Instead of using your pick hand to mute the strings, you’ll use the fingers of your fretting hand. The idea is to play two or three muted strings followed by an unmuted note in quick succession. This creates a percussive click sound just before the note sounds.
For example, you might lightly rest your index finger against the 4th and 3rd strings while fretting a note with your middle finger on the 2nd string. Quickly strumming through the 4th, 3rd, then 2nd string adds some spice to the note played on the 2nd string because of the clicks of the 4th and 3rd strings immediately before. This technique is typically used by lead guitar players in a variety of genres, from country to blues.
Bends
Few techniques create more expression and more emotional resonance in a guitarist’s playing than string bending. A staple of any lead guitar player’s toolkit, string bends create a lyrical quality to your playing. Instead of plucking individual notes one at a time, string bends allow you to seamlessly slur two or more notes one after the other.
To play a bend, finger a note on any string, preferably the higher four strings over the lower two, and after plucking the note, use your fretting finger to push the string up toward the string next to it. This causes the note to rise in pitch without requiring a second plucking of the string. Bending can be tricky to master because you have to learn the feel for how far to bend a note. There are half-step bends, whole-step bends, and even whole-and-a-half-step bends, and you have to practice a lot to get the feel of each.
Explore string bending with this video lesson from JamPlay.
Vibrato
Vibrato adds character and expression to your notes and gives personality to your overall playing. In fact, vibrato mimics the qualities of a singing human voice and makes individual notes stand out. Along with string bending, vibrato is a common technique in any lead guitar player’s arsenal.
To give your notes vibrato, you can either rock your finger back and forth to create a wobbly sound in the note, or you can subtly and rapidly bend the note up and down on the fret. This technique works best with the sustain of a distortion-driven guitar.
Harmonics
Whenever you play any note on the guitar, the sound you’re hearing is called the fundamental note. For example, if you play the note on the 5th fret of the 6th string, you’ll hear an A note. But on top of that A note are several overtones or harmonics that you don’t hear because they’re mixed in with the fundamental note. Guitar is a unique instrument because you have the ability to isolate those harmonics.
Natural harmonics sound out when you lightly place a finger on the string over certain frets and pluck the string. The easiest natural harmonic you can play is on the 12th fret, but there are also natural harmonics on the 5th and 7th frets.
Artificial harmonics can be played by fretting a note and using your pick hand index finger to lightly touch the string roughly 12 frets above the fretted note and picking the string. Harmonics are an expressive technique that can be a challenge to master, but they create some interesting opportunities for sound exploration.
Watch this JamPlay video lesson to learn more about harmonics.
JamPlay is home to more than 500,000 guitarists with guitar lessons from world class instructor artists in every genre and for every interest to power up your guitar skill. Join at JamPlay.com.

Related Posts
Comments
A Guide to Bass Amps: The Dos and Don'ts
JP BLOG
Share this
The greatest and most embarrassing mistakes I have made as a bassist all revolve around bass amps and cabinets. Some of these mistakes were due to good old fashioned stupidity, but most were the results of a painful ignorance concerning how bass amps actually work. Learn from my mistakes, it’ll save you a lot of money and heartache down the road.
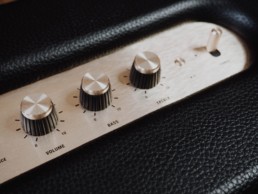
Terminology to Know
It’s super important to understand the vocabulary around bass amplifiers because being able to read a manual is the difference between a functioning amp and a broken amp.
So let’s clear up what exactly an amp is. Basically (no pun intended) an amp amplifies your signal which is then sent into a cabinet which houses the speakers that project that signal into the grateful ears of a listener. Most low wattage, beginner/intermediate bass amps combine these two aspects together: amplifier and cabinet, into one piece of gear: The Combo Amp.
Combo amps are great for rehearsal spaces, small shows, and people tired of hauling around speaker cabinets. They’re reliable, easy to use, and sturdy, and have earned their reputation as the beloved pieces of equipment that they are. The other option for bass amplifiers, as you might have guessed, is a separate cabinet and amplifier, more commonly known as: The Head and Cab
The separate head and cabinet option is super versatile, allowing knowledgeable bassists to customize their rig for many different performance scenarios. HOWEVER, you must have a solid knowledge of how amps and cabinets work if you want to avoid breaking your gear. Here are three factors that I ignored when first venturing into the head and cab setup that wound up giving me broken, useless, equipment. Let me be the cautionary tale.
Ohmage
This symbol Ω is the law of the land when it comes to bass amplifiers. It measures resistance in terms of the current flowing from your amp into your cabinet. Most bass amps are rated at either 4 Ω, 8 Ω, or 16 Ω. The higher the ohmage, the higher resistance your amp will safely operate at.
Cabinets are also rated in ohms, which tells you how much resistance the cabinets put up to your Amps signal. If your amp head is rated at 8 Ω and you send that signal into your cabinet rated at 8 Ω, everything’s going to be okay. If your amp head is rated at 8 Ω and you send it into a cabinet rated at 4 Ω, you’re playing with the wrath of God. \
Nowadays modern amps can usually handle 8 Ω or 4 Ω, which means you can pair that amp head with a 4 Ω cabinet OR two 8 Ω cabinets. When you pair two cabinets together, their total ohmage is halved in proportion to their individual ohmage. I know this is starting to sound like a math problem, because it is! So basically, two 8 Ω cabinets = 4 Ω total resistance.
If this sounds confusing, that’s because it is. So unless you’re an expert in audio technology, just match the ohmage of your amp with your cabinet. Remember, before you buy gear or experiment with gear, READ THE MANUALS. Unless you’re using some rare vintage equipment, gear manuals are easily found on their manufacturer’s website.
Wattage
The W is not as unforgiving as the Ω but it must still be feared and respected. Wattage is quite a bit easier to understand than ohmage. Your amp’s wattage rating is a lot like horsepower in your car, and typically it denotes the maximum amount of power your amp can produce. Some manufacturers, I won’t name names, lie about their wattage the same way car manufacturers lie about how much horsepower their newest sport model makes.
Cabinets also have wattage ratings which refer to how much power they can handle coursing through their veins. Just like with ohmage you want to match your cab and head. For example, send a 250 watt head into a 250 watt cab. Now, you do have a bit of leeway here. Technically, you can send a higher wattage head into a lower wattage cabinet and not damage it if played at low volumes, but if the difference in wattage is substantial I wouldn’t risk it.
Likewise you can send a lower wattage head into a higher wattage cabinet, but you do run the risk of underpowering the speakers which can definitely damage them, especially if the difference in wattage is substantial i.e. more than 50 watts.
As with ohmage, if you’re unsure, READ THE MANUAL.
If you’re in the market for a new amp and you’re wondering how powerful of an amp you need, think about your circumstances. If you’re playing with a half-deaf drummer and you want to be heard, I’d recommend at least 100 watts. But it’s more about being heard, it’s about sounding good.
If you have to crank your volume to 10 (never a good idea, jokes aside), you’re going to get an ugly, distorted sound. If that’s what you want, great! But generally I would advise that you buy an amplifier which, in any given situation from band rehearsal to live shows, you never have to push past 60% to 70%.
Speaker Cables
Now we come to the most shameful of all mistakes I have made with bass gear. I have made this mistake not once, but two times! On the back of your amp head, there’s a jack for a cable that will send your amp’s signal into the cabinet. DO NOT use some ¼ inch instrument cable to connect these two pieces of equipment. ¼ inch instrument cables are shielded, they have more resistance because they carry your bass’ small pickup signal to the amp which then makes it MUCH larger.
If you use another shielded instrument cable to carry that amplified signal to your cabinet, it will be like creating an LA traffic jam in your amplifier. Does that sound like a good thing? No. So use an unshielded speaker cable, they’re just as cheap as shielded ¼ inch cables and found in any respectable music store.
If this is all too much to deal with, buy a combo amp. Fact of the matter is, if you want to play electric music, you have to become an electrician. My final piece of advice is this: don’t take chances with your gear. It costs nothing to look up your equipment’s specs in the manual, it costs hundreds of dollars to replace or repair broken amplifiers and speakers. You learn best from failure, so learn from mine. READ THE MANUAL!
Mastered your gear and ready for more? Become a member at JamPlay.com and get your free Bass Essentials Player Toolkit. Challenging and engaging exercises for bass players of all skill levels, with lessons designed to maximize your fretboard knowledge, improve your chord comprehension, and hone your dexterity on the instrument. Explore bass guitar through the lens of both blues and rock music — from classic blues to classic rock, psychedelic rock, grunge rock and more.
JamPlay is home to more than 500,000 guitarists with guitar lessons from world class instructor artists in every genre and for every interest to power up your guitar skill. Join at JamPlay.com.

Related Posts
Comments
Learn to Play This Classic Love Song on Guitar
JP BLOG
Share this
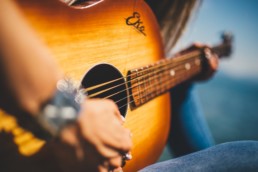
It’s February! The month we celebrate all things love. Looking for a way to express your guitar love to your love? Lucky for you, we have the answer: take those guitar skills and strum your special someone a love song.
Let’s go through all the skills and steps necessary so you can impress your boo with a modern twist on the classic “I Love You Truly” by Carrie Jacobs-Bond.
How To Play “I Love You Truly”
This classic song has been covered by so many famous artists, but we are loving a variation of a version done by Connie Francis.
To play this version on your guitar you will need to have the basic chords down. There is one barre chord, Cm, but that is by far the toughest part of the song. The other chords are C, G, Am, E, and F (which is technically a barre chord, but you can play it without barring the 1st fret).
Here’s a quick guide to help you know what to play, when:
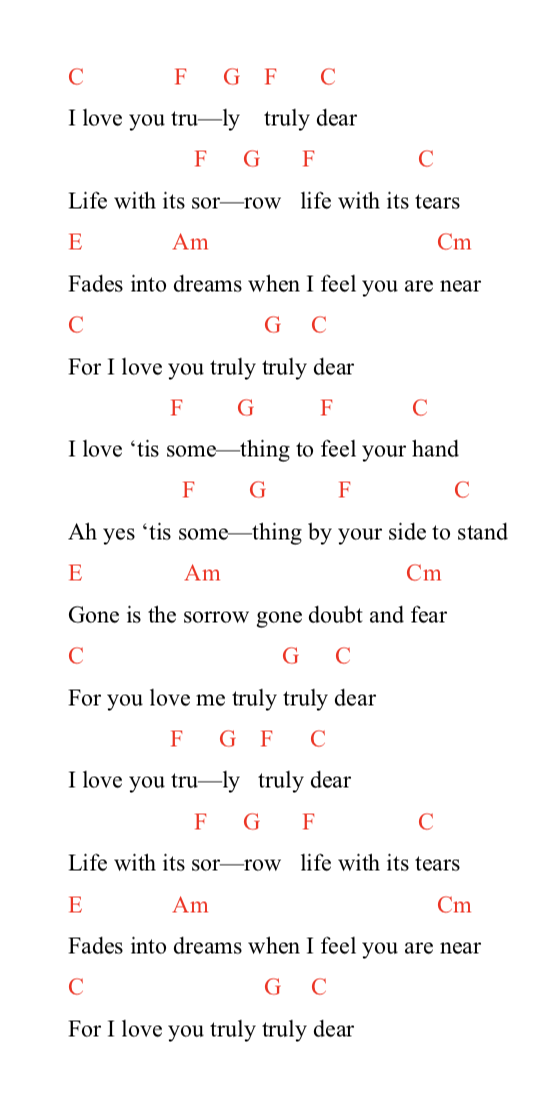
How to Read the Guide
Reading the guide is simple and you will pick it up in no time.
- Listen to the song so you can hear the basic rhythm of the song.
- The chord you are supposed to play is over the corresponding lyric in the song. For example, you start playing a C chord, but once the lyric truly starts you will switch to an F chord.
- Don’t get frustrated if it’s hard to read and play at the same time. All you have to do is take it line-by-line until you know it by heart.
- That’s it! If you’re at this step you have successfully learned the song from the guide. Great job!
Practice Your Skills
We get it! This part is a bit bland. But trust us, the more of a foundation you have and the more comfortable you are with playing, the easier mastering this song for your better half will be.
Barre Chords: At this point, you know the basic chords, but what about that pesky barre chord. JamPlay has a step-by-step video to follow so you can master playing that Cm– or any other chord for that matter!
Playing and Singing: You won’t get away with not singing these wonderful lyrics to your partner, so you will have to know how to play and sing at the same time. It can be tricky, but no need to worry because JamPlay has a 15 lesson toolkit that makes it easy!
Have fun! This is the most important skill of all to work on. Remember that it doesn’t have to be perfect; it’s the thought that counts. Even if it’s not perfect, if you follow this guide and play, we know it will be perfect for them.
Head on over to JamPlay and learn the skills you need to to fire up your guitar love.

Related Posts
Comments

Using JamTracks To Inspire Your Practice Routine
JP BLOG
Share this
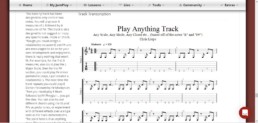
As most self-taught musicians know, finding quality backing tracks to practice your soloing and accompaniment on can be a major hassle. I have spent countless cumulative hours scouring Youtube looking for a backing track with the right “feel” and, if I’m lucky, in the right key.
Fortunately for us, Jamplay has the widest and most diverse selection of backing tracks that I’ve ever seen on one site. When I first tried out their JamTracks in Tools, I was blown away with the sheer quantity of tracks. I felt like a kid in a candy store and I had to try them all.
At first I just flitted around the list, mostly selecting by the names of the tracks (I think Amish Funk is what first got my attention). The tracks themselves are usually about five minutes long and far from your typical four-bar loops. These backing tracks have layered, constantly evolving accompaniment that will force you to listen! You’re not playing over some mindless drones. There’s actual musical topography for you to explore and react to for any genre.
Better yet, there’s even an added transcription of the tracks if you want to dive deep into the theory of what you’re playing over. The transcription includes the chord names, the chords written out in standard notation, and the chords in tab. You truly cannot ask for more. Even so, JamTracks still delivers and gives you suggested approaches and scales for the backing tracks
The massive amount of options and opportunity can be a bit daunting, especially if you’re looking for a specific genre to work on. Thankfully there’s an option to filter by Genre, Key, or Instructor. Each genre gets its fair share of the tracks with Rock having the largest selection.
The actual quality of the recordings needs to be mentioned. I definitely expected it to all sound “computery” and stale but I truly would not be able to tell if these were all programmed or recorded by an actual band. The tones are rich, the drums are vibrant, and I didn’t feel like I was playing along with robots.
So how would one best go about using JamTracks for practicing? These backing tracks could serve many purposes. They could be great “leisure tools” i.e. something to unwind with at the end of your practice session as a kind of reward. Likewise they could also be used to warm up your fingers before getting deep with a metronome or into a specific technique you’re trying to master.
The JamTracks themselves are great tools for learning both theory and song structure. Because the tracks are transcribed, you can actually see the “skeleton of the music” and analyze what’s going on. You can learn new chords, how to use them, and where to use them. Some of the jazz backing tracks get into some pretty advanced theory in terms of following rapidly changing chords, but they avoid the fatal mistake of explaining too much too fast.
What I really love about these backing tracks is that they target the different feels of music. What you learn from one feel you can apply to another, regardless of genre. The grooves you learn from Southern Metal are directly related to grooves you’ll use in Funk.
My only word of warning is be wary of getting lost in all the tracks. Use them in a targeted, deliberate manner in order to focus on one particular concept (minor pentatonics, chord changes, etc.) as you pursue larger lesson objectives. Overall these backing tracks are an invaluable tool in your toolbox. They’re not the end all be all of practicing, but they’ll add a lot of fuel to the fire and should accelerate you on your way to musical mastery like few other online resources can.
So with all this in mind, here’s a quick step-by-step guide for maximizing your use out of these JamTracks.
Find Your Target Area
Are you trying to get better at being able to “shred on demand” or are you looking to develop a lighter touch with your music? Setting goals like these should be your first priority in terms of bettering yourself as a musician.
Work Your Way Up
If you’re trying to develop your fluency as a jazz guitarist, don’t start with pan-modal backing tracks (that term sounds just as convoluted as it is). Instead, start with simple 2-5-1’s or Blues Progressions. The same goes for other genres. There’s no shame in slow metal grooves, just as there is no shame in four chord pop songs. We all have to start somewhere.
Analyze The Tracks
As I said before, these aren’t mindless backing tracks, and you’re not some mindless musician. Be mindful about what you’re doing. Ask why those chords are played where they are played. Challenge yourself to play those chords in a different way, in a different place on the neck.
Stick With The Tracks
If you like a certain track, keep working with it! Try to dig out all the possible sounds you can hear from the implications of the chords. Don’t just noodle the same old thing the same old way over the same old track. Really try to stretch the limits of what you can play. Don’t play just what works, play what sounds good to you, and push that to the breaking point.
All in all, it’s important to keep in mind that these tracks are tools. They are not the finished product. Use them, use them as often as you can, but do not confuse them with yourself. We use backing tracks to prepare ourselves to play with other musicians, and if you get in the habit of thinking of all music as a backing track, you’re in for a very rough time indeed.
Ready to try JamTracks? Become a member and join the more than 500,000 guitarists who have experienced JamPlay. Try out JamTracks and tap into guitar lessons from world class instructor artists in every genre and for every interest to power up your guitar skill. Become a member today at JamPlay.com.
Related Posts
Comments
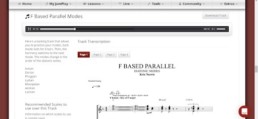
Sonic Paradoxes: 4 Genius Genre Pairings To Explore
JP BLOG
Share this
People often say that opposites attract. The same rings true for music. It’s all too easy to get stuck listening to the same old songs and styles. Taking time away from your “anchor genre” to explore other realms of music will not only make you a better, well rounded musician, but also help you bring new and exciting ideas and approaches into your favorite style of music.
So for this new year of 2021, seek out the opposites! Here I’ve outlined 4 great genre pairings which might sound weird on the surface but actually share many deep similarities.
- Metal and Bluegrass
Metal and Bluegrass might seem as far apart on the musical spectrum as one can get, but you only have to look beyond the instrumentation to see the roots below. I’m probably going to step on a lot of toes when I say this, but most Metal and Bluegrass songs are in the same keys. Almost every metal song written is in either E minor, A minor, or D minor (coincidentally the 6th, 5th, and 4th strings of the guitar).
Likewise almost every Bluegrass song is either in G major, C major, or D major (the keys easiest for accompanying banjos, fiddles, and mandolins to solo over). Furthermore, they are both genres that value virtuosity. Most successful metal guitarists are highly proficient, if not technical masters of their instruments. Bluegrass is the same. You cannot fake bluegrass.
Both genres are also played at lightning fast speeds, often reaching or exceeding 200 BPM. This speed is fundamental to the sound and feel of both genres, and listening to a banjo shred Cripple Creek can be just as exhilarating as listening to Marty Friedman play Tornado of Souls. If you’re looking for a great crossover artist who started in metal and moved into bluegrass, look no further than Billy Strings’ “Dust in a Baggie.”
2. Country and Reggae
Country and Reggae are both charismatic in terms of their geography. Country was born more or less in the lowlands of the south and Reggae got its start in Jamaica. Quite different places right? On the surface it looks like they could never work together.
But I challenge you to take your favorite country songs and play them with a choppy, off beat rhythm and sing them with a more laid back voice. You’ll be surprised just how good it can sound.
Don’t believe me? Check out the Toots and the Maytals version of John Denver’s “Take Me Home, Country Roads.” With a few different words here and there and a Reggae inflected rhythm, the entire feel of the song shifts but the spirit stays the same.
Reggae and Country are both emotive genres. They’re happy and sad at the same time. They focus on the drama of daily life in their respective regions. By blending these two approaches together, you’ll catch a glimpse of commonalities between all human experience. THAT will make you a better musician, more than anything else.
3. Rock and Jazz
It’s no secret that Jazz is not nearly as popular as it used to be sixty years ago. The terms “elevator music” and “easy listening” have banished away the thought that Jazz can be as exciting or even as intense as Rock can be.
Spoiler Alert: it can be.
The loud, outrageous drum fills we so often characterize with Rock got their start with drummers like Elvin Jones, Art Blakey, Max Roach, and Buddy Rich. The electric guitar and the idea of distortion came about in part as an answer to the coarse tones of the saxophone in terms of its presence and intensity. The walking bass line pioneered by Jazz bassists made a natural translation into Rock through players ranging from Paul McCartney to Geddy Lee.
Because Jazz and Rock both share the Blues as their template, their approaches to soloing often overlap.
If you can solo over the twelve bar blues, you’re off to a great start in feeling comfortable in both genres. Want some help? Check out the JamPlay video lesson to help you dive deeper into improvisation.
Soloing Over the 12 Bar Blues
Jazz and Rock were also both reviled by the majority of the public when they made their debut on the world, but then eventually came into vogue as dominant genres. Jazz might seem smooth and clean on the outside, but don’t judge a genre by its cover.
If you want to hear Jazz be as groovy and as powerful as Rock, go listen to John Coltrane’s “A Love Supreme” and imagine the saxophone is instead a guitar being played by David Gilmour.
4. Funk and Hip Hop
Out of everything we’ve covered here today, Funk and Hip Hop have the most in common, and they should. Hip Hop is a direct descendant of Funk. Hip Hop began in house parties in Harlem in the early 70’s where the first DJ’s played James Brown records and “rapped” over the beats while everybody danced.
People might complain that Hip Hop has strayed too far away from its roots in physical instrumentation (i.e. too many drum tracks, programmed sounds) but one doesn’t have to look far to hear great artists like Anderson .Paak, Kendrick Lamar, and The Roots blend the flow of Hip Hop with the rhythm of Funk. It’s a match made in heaven.Guitar has a place in both genres. But it’s a challenging place, because for once the guitar usually doesn’t take a lead role. If you want to be brave and experience an overlooked option with your instrument, learning funk rhythms on guitar will set you well on the road of Funk and Hip Hop.
There’s no time like the present to listen to as much music as you can, as much as you can. The genre pairings I’ve talked about here today are only a few of the many different options out there. You can learn a little from everything because, at its core, music is music. Genre is only a matter of application.
Make 2021 the year you learn to play guitar FOR REAL. We have 7,000+ guitar lessons and over 100 artists and instructors who can help you on your learning path. Explore content to help you get started and join JamPlay today.

Related Posts
Comments

4 Guitar Effects to Change Up Your Guitar Sound
JP BLOG
Share this
Easily one of the most enjoyable aspects of guitar playing is manipulating the sound of your playing through guitar effects. From searing distortion-driven lead lines to thick warbly rhythm tones, there’s almost no limit to the creativity you can use in creating your own unique guitar sound. In fact, the options can be a bit overwhelming, especially if you’re not sure what each effect does to your sound. With the new year coming up, it’s a great time to consider what effects to add to your arsenal.
Four of the most versatile effects follow. Find yours here.
Distortion
Distortion is probably the first go-to effect for most guitar players because it can give your rhythm lines a crisp crunchy sound to drive songs in a variety of genres, such as hard rock or even pop, or give your lead lines a screaming sustain, perfect for guitar solos. A distortion pedal increases the gain of the audio signal coming from your electric guitar so that it’s boosted beyond its peak, creating harmonic overtones that normally don’t sound very good, but create just the sound guitar players want when applied to guitar tones. Most distortion pedals include controls for the actual gain you apply to the signal, the output volume, and a control for EQ, allowing you to manipulate the tone of the distorted sound.
Many amps themselves include controls for gain so that you can add distortion without using an external pedal, or you can combine a distortion pedal with the gain on your amp to create an even more distorted sound than you could with either alone.
Ready to dig deeper? Watch our JamPlay videos, Anything Goes, Crank up the Gain and Amp Gain Overview from the JamPlay course, Overdrive and Distortion, part of the 2020 Gear, Tone, and Studio Toolkit. The JamPlay Practice Plan Toolkit includes 10 lessons on distortion and overdrive techniques. Get a toolkit of your choice FREE with the annual membership to JamPlay.
Because distortion is so versatile, it’s important to understand the individual components involved with creating distortion so that you have more control over your sound to create the tone you want.
Delay
Delay is also one of the most commonly used effects among guitarists. A guitar signal is recorded and repeated, creating an echo effect. You have the ability to control the speed at which the signal is repeated. Quicker repeats create a slapback effect because the note or notes will be repeated immediately or almost immediately after you play them on your guitar. Slower repeats create a cascading wash of sound. You can even create a reverb effect, creating the sound of playing in a large room. Delay can be used to thicken up guitar rhythms, especially if you’re the only guitar player playing in a group, or you can use it to create shimmering lead lines for guitar solos.
Compression
A compressor pedal can be really helpful if you’re playing live performances. Essentially, a compressor evens out the dynamics of your playing, making loud moments sound softer and soft moments sound louder. If you’re playing a soft single-note riff, for example, the compressor will boost the signal so that it’s able to be heard. Or if you accidentally strike a note too hard, the compressor keeps that note from unintentionally standing out from the rest. Guitar players use compression to help their guitar tone to not get lost in a mix with a live band. It can also be used to add sustain to your guitar leads.
Phaser
A phaser pedal was a favorite effect used by Eddie Van Halen and can also be heard in the songs of Incubus and Hoobastank, among others. This swirling sound effect is created by duplicating the input signal from a guitar and combining a dry signal with a duplicated signal pushed through an all-pass filter, which cuts and boosts frequencies, creating a sound that modulates in and out of phase. This effect sounds great with single-note riffs and can be combined with a clean tone or distortion. Most phasers include a control for the speed or rate of the effect. A faster rate creates a more warbly sound, while a slower rate creates slow dips and peaks in the sound.
Each of these effects can give you an incredible amount of control and creativity over your sound, and they’re used by some of the best guitar players around.
Get ready to use effects to take it to the next level. Make 2021 your year of guitar.

Related Posts
Comments

JamPlay Holiday Concert & Learning Series Festive Fingerstyle with Amber Russell
JP BLOG
Share this
Join us as our special virtual holiday concert and learning series continues with renowned performer and composer Amber Russell for JamPlay’s final FREE live studio concert and learning session of the season. Amber’s unique playing style is something to behold, so you don’t want to miss this private concert. We’ll also have Amber answer a few audience questions and share her advice for creative and courageous playing. And don’t forget there will be gear giveaways and more prizes to wrap up the night!
This even took place on Tuesday, December 22 at 9 pm EST. Here is the full video:
Join the more than 500,000 guitarists who have experienced JamPlay. Guitar lessons from world class instructor artists in every genre and for every interest to power up your guitar skill. Become a member today at JamPlay.com.
Related Posts
Comments

Jamplay Holiday Challenge: Learn We Three Kings Before Christmas
JP BLOG
Share this
If you’re a musician, your family is going to ask you to play a Christmas song for them. They’re expecting you to sit down on the couch by the tree and play something on that new guitar they bought you. They don’t realize that you loathe being paraded out in front of the family for every holiday get-together.
So Perform we Must
But it is our sworn duty as musicians to perform, and so perform we must. So what do we play? Of all the songs of Yuletide, none can equal We Three Kings in terms of melody and mood. This is a dark song, almost foreboding, with a beautiful melody and relatively simple chords that most beginners should put on their hit list to learn.
But before you go running off looking up the tab to We Three Kings, let’s go over the song itself and explore a few different ways to approach learning it and adapting it to fit any style you want.
But First…
First thing’s first, this song is in the key of G with a dominant third and it makes use of almost all of the chords in that key. So before doing anything else make sure to learn all the chords in the key of G. In case you don’t remember they are (in ascending order):
G major
A minor
B minor (for this song we’ll play a B7)
C major
D major
E minor
Gb minor7 b5
You won’t need to use that final chord and REMEMBER: the B minor (the third chord) is dominant in this song, so it’s a B7.
If you can internalize all that, you’ve just learned a very important lesson in music theory and now you know all the chords for We Three Kings! Now let’s examine the structure.
The song is a simple verse-chorus repeated ad infinitum. For beginners, the structure of the verse and chorus might be a bit complicated to take in all at once. Here’s what I do whenever I want to learn a song that is complicated to me.
Learn How To Sing It First
Learning and internalizing a melody to where you can sing it on a whim is the single most effective step when learning a new song. It means you’ll know how it goes before you know how to play it and generally it’s very easy to accomplish. Just practice singing along to a recording of the song while you’re in the car or doing chores or at the DMV and you’ll get it stuck in your head in no time.
Work Small
Unless you’re an advanced player, I’d advise against trying to learn this song all at once. Instead break it up into easily manageable pieces that you can learn and internalize gradually. This approach might take you twenty minutes, it might take you twenty days, but the point is you will inevitably learn the song.
Understand The Structure
We know all the chords that are in this song so let’s review how these chords are ordered to make the melody.
Okay, so the first verse of this song is typically played:
E minor /// /// B7 /// Eminor ///
Those little dashes represent beats, and as you can see they’re grouped in beats of 3 which means this song is in ¾, like a waltz.
Practice getting the feel of that chord progression under your fingers by playing along to a recording. Then move on to the next bit which goes like this:
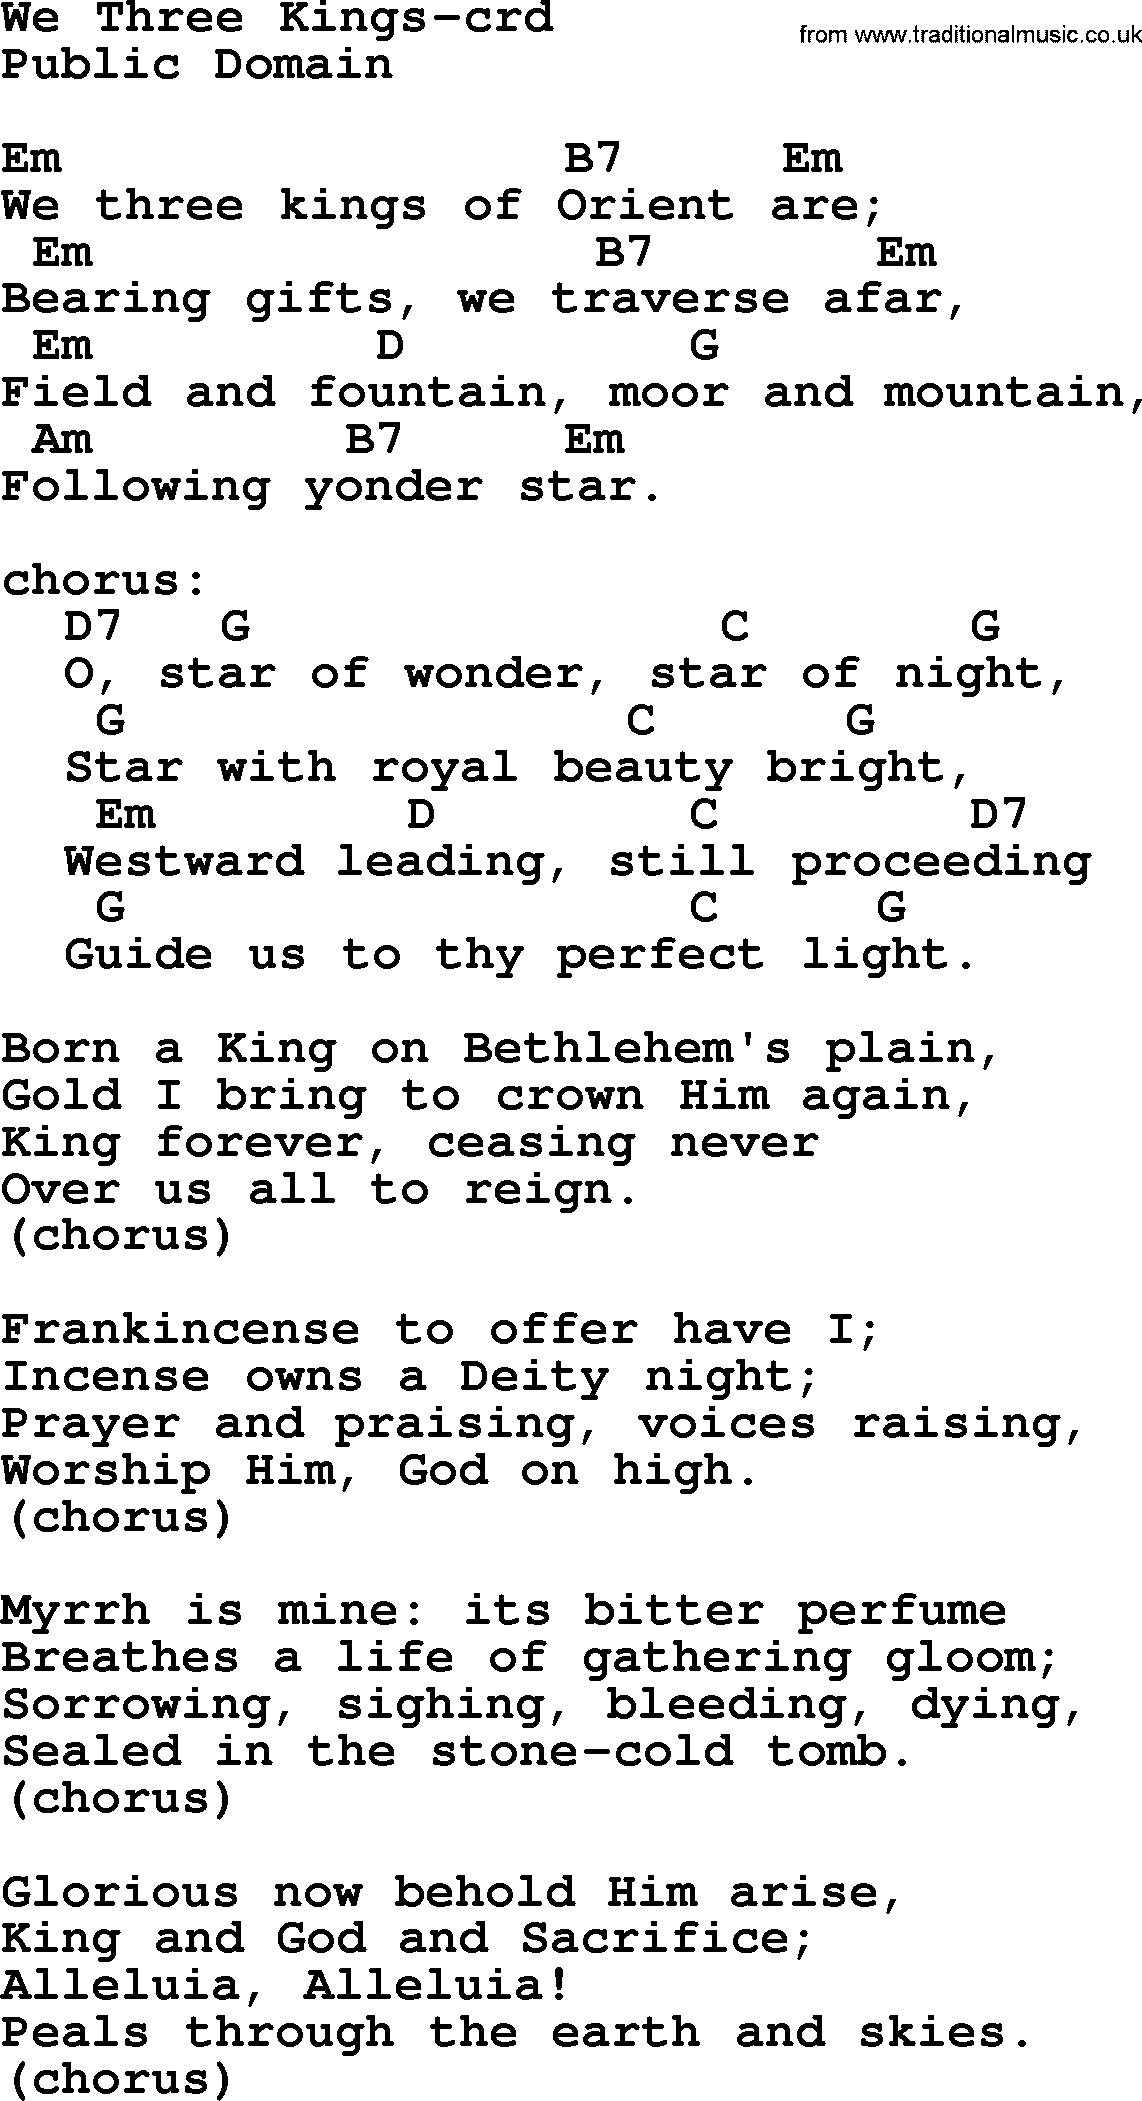
Source: https://www.google.com/url?q=http://www.traditionalmusic.co.uk/top-hymns-chords/we-three-kings-crd.htm&sa=D&ust=1607724922686000&usg=AOvVaw3VfbnZzOsMiBcfWXJJEhjd
That’s the whole song!
Take all those parts and practice them on their own, then slowly add them together till you can play without needing the recording as accompaniment. When you’re ready to add your doubtlessly perfect, beautiful singing voice into the mix just follow the same sequence of steps you used to learn to play the song in the first place: piece by piece.
If this is your first time singing while playing then you’ll probably find it incredibly difficult, as it is for everyone their first time. Typically people will complain that they can’t keep their voice independent from their hands and that’s exactly the wrong attitude to have. There is no independence between your hands and your voice, they work together and share the rhythm and the melody.
Think of your voice as part of the rhythm
Pay attention to where the words land in relation to your strumming hand and your fretting hand and think of them as all working together! That’s the best advice I can give you, learning to sing and play simultaneously is all about your mindset.
 From Christmas Song to Rock Song
If you’re feeling mischievous, this song can easily be translated out of its Christmas hymn style into a more… interesting genre. If you want to take this in a rock direction, change the time from ¾ to 4/4 but keep the chord progression the same.
If you want to go even farther down the rock spectrum, just play all the chords as muted power chords, speed up the tempo, and throw some E minor pentatonic solos over the chord progression.
There’s nothing more fun than taking a known song and twisting and mutating it into a monster of your own creation. If you have any effects pedals, go crazy with those and try to take the song into a new direction. Try changing the chords around and inventing new melodies. It might sound childish but this is how new songs are created and you might just find you’ll like your version better than the original! So listen to it, learn it, and then go beyond it, all by Christmas Day.
Join the more than 500,000 guitarists who have experienced JamPlay. Guitar lessons from world class instructor artists in every genre and for every interest to power up your guitar skill. Become a member today at JamPlay.com.

JP BLOG
Share this


JamPlay Holiday Concert & Learning Series
JP BLOG
Share this
Join us for a special virtual holiday concert and learning series. Register now for exclusive access to our JamPlay Holiday events. This month, we’re getting festive with 3 learning sessions featuring some of our favorite JamPlay instructors, private performances, simple song lessons, gear giveaways and other fun prizes. Register today — it’s FREE!
Our first event in the series, Holiday Harmonics with Trevor Gordon Hall, took place Tuesday, December 8, 2020.
Watch the full video here:
Acclaimed fingerstyle artist Trevor Gordon Hall joined us for our first live studio concert and learning session. Trevor played some of his original pieces for us, discussed his style and creative process, and answered a few audience questions.
Upcoming Events
Festive Fingerstyle with Amber Russell, Tuesday, December 22 at 9 pm EST
Register Here
Join the more than 500,000 guitarists who have experienced JamPlay. Guitar lessons from world class instructor artists in every genre and for every interest to power up your guitar skill. Become a member today at JamPlay.com.